
Converting a Winegard DirectTV SWM Trav’ler to DISH on a 2017 Entegra
12/20/2020 update: For newer Trav’ler systems built after 1/1/2018 or conversion kits built after 11/26/2019 please see the info here before proceeding.
INTRODUCTION:
Besides an in-motion dome satellite DISH system, Entegra Coach also offers a Winegard Trav’ler for DirecTV and SHAW (Canada), but do not offer a DISH version (12/20/2020 update: for the 2022 model year Entegra will reportedly be offering a Hopper3 ready DISH option). As prior DISH subscribers, when we purchased our 2017 Entegra we ordered the DirectTV Trav’ler and later converted it for use with DISH and how we did that is described in this post. We’ll keep the DirectTV parts in case we decide to convert to DirecTV in the future.
This post is divided into the following sections:
SECTION 1 – The conversion of a Winegard Trav’ler from DirecTV to DISH. This info is applicable to any coach or situation.
SECTION 2 – The Entegra specific reconfiguration of the wiring, using Entegra factory installed “prewiring”, to support the DISH system on a 2017 Entegra Aspire. This info should apply to most 2015 – 2017 (as well as some earlier and most later) Entegra models that were ordered with a DirectTV Trav’ler option. It should also apply even to those Entegra’s that only have the In Motion Dome unit as long as the Trav’ler prewire was provided by the factory. In addition, guidance is provided for 1/1/2018 and newer Trav’ler units which are compatible with the Hopper 3 and conversion kits produced after 11/26/2019 which will greatly simplify the installation.
SECTION 3 – Eastern Arc vs. Western Arc issues and considerations particularly in regard to HD locals. Also, using an Eastern Arc LNB with the Trav’ler.
SECTION 1 – CONVERTING A DIRECTV TRAVLER TO DISH
The LNB/Reflector swap described below is valid for a Winegard Trav’ler DirecTV to DISH conversion regardless of brand of coach.
The DirectTV version of the Trav’ler can be converted to work with DISH (for about $300 in parts), but the DISH version of the Trav’ler can NOT be converted to work with DirectTV. This is because the DirectTV turret base is built to handle the larger DirectTV reflector, but the DISH reflector is smaller and the DISH version of the Trav’ler uses a lighter duty turret. Note that the DirectTV and DISH turrets have an identical footprint and other dimensions, but the so called “large” DirectTV turret simply has heavier internal mechanical components.
Parts needed:
- Winegard RPSK21 – For Trav’ler units built before 1/1/2018 only. DISH Western Arc LNB and arm assembly with adapter plate for Trav’ler. Note, this kit comes with the previous generation Dish Pro Plus (DPP) LNB.
- Winegard RPSK21H – For Trav’ler units built on or after 1/1/2018. DISH Western Arc LNB and arm assembly with adapter plate for Trav’ler. Note, this kit comes with the current generation Dish Pro Hybrid (DPH) LNB.
- Winegard RPSK11 – DISH reflector.
- Add a DISH Solo Node if you are installing a Hopper 2 or older.
- Optional DISH Splitter and/or Tap.
- Add a DISH DPH42 if you are installing a Hopper 3 and have a Trav’ler produced prior to 1/1/2018. Trav’ler systems prior to 2018 are incompatible with the DPH LNB required by the Hopper 3, and the DPH42 adapts the DPP LNB that comes with the RPSK21 to work with the Hopper 3.
- Add a DISH Dish Pro Hybrid (DPH) LNB (latest generation) plus the Yoke Bracket (or use this kit) if you are installing a Hopper 3 and have a Trav’ler produced after 1/1/2018. 2018 and newer Trav’ler systems are fully compatible with the DPH LNB required by the Hopper 3.
- If you have a conversion kit produced after 11/26/2019 it comes with the DPH LNB and no other additional equipment is required. This is also a single coax installation so there is no need to use the 3 coax prewire, simply use the existing DirectTV coax.
Hardware swap:
The instructions provided with the RPSK21/11 kit are clear and detailed, just follow them and you will have no issues. The only discrepancy I found was the instructions say to remove 4 bolts from the reflector, on mine there were just two bolts, the other two were tabs.
The photo below shows the DirecTV reflector and LNB removed. The new DISH LNB is at the bottom of the photo.

Removal of the DirectTV adapter plate requires a hex wrench:

The DirectTV LNB has just one coax…

…and uses only one of the three available ports, DISH will use all three connections:

The DISH adapter plate:

And the DISH LNB installed:


The DISH reflector installed. The above steps are a 10 minute job not counting time to stop and read the instructions:
DirecTV parts removed and to be saved for possible future use:

SECTION 2 – Wiring: from here on these instructions are Entegra specific.
This install was done on a 2017 Aspire. Note in the photo below the control cable and coax running into the roof “vent” which is used as a waterproof wiring chase.

The “cap” for the vent can be removed by carefully slicing thru the silicone and freeing the three “feet”. A #2 square Robertson bit will make it easier to probe into the sealant and remove the three screws. Note that the newer Entegra’s use a much improved NuFlex 311 Self Leveling Silicone sealant on all roof seams.

Here’s what I found when the cap was removed. Those three coax are for the DISH install:

It took a bit of digging to get enough foam out to free up the three coax. To reseal the cap when done I used Great Stuff expanding foam inside the vent cap and black silicone to reseal the vent cap cover feet:

Note the colored tape marking the coax, Red, Green, Blue.

The single DirecTV coax already connected to the base as shown in the photo below will be removed and the three DISH cables attached to the three ports. It does not matter what color goes to what port but I followed the color schemes used in THIS DIAGRAM just for consistency.
Before you get off the roof, double check the turret type on the base, you will need it to reprogram the controller. If it is a DirectTV system, it should be marked “LG 2112”.
That’s it your’re done on the roof! Now follow the Winegard instructions to reprogram the controller for DISH. When I was done with that and had it search for satellites this is what my display showed:

Next head for the coach basement, you need to find the other end of those coax with the Red, Green & Blue tape. On my 2017 Aspire they are just inside the last cargo bay door forward of the wet bay on the passenger side, tucked up behind the slanted panel. Here they are at the top of the photo below after I pulled them out of hiding:

At this point it would be a good idea to permanently unplug the 00DirectTV SWM power inserter from the AC power (above photo right).
Next there are variations depending on what you have for receiver(s).
For standard basic receivers you are simply going to take the 3 coax from the roof (Red, Green, Blue) and patch them into thee coax runs for MAIN, BED and EXTERNAL. These are the three coax on the 4 port side of the green SWM splitter shown in the above photo (my coax had labels but they are not visible in the photos). Note: if your coach never had the factory Trav’ler option you will not have the SWM splitter, power inserter and associated parts, but I assume the coax prewire will be there regardless (at least after 2013, I did not have prewire coax on my 2013 Aspire)
For a Hopper 2/Joey setup (like mine was originally) you are going to take two of the RED/GREEN/BLUE coax and route them to the input side (bottom of photo) of a SOLO NODE like this (again which color coax you use doesn’t matter):

The third coax from the Trav’ler on the roof should be terminated with an F-cap as shown.
The coax that goes to your Hopper should be connected to the HOST port of the SOLO Node – for example, on a 44B the Hopper fits fine in the living room, so connect the MAIN coax to the HOST port. On a 42RBQ the Hopper will fit better in the bedroom so connect the BED coax to the HOST port.
If you have no Joey’s terminate the CLIENT port with an F Cap and you’re done.
If you have one Joey, connect it to the CLIENT port on the SOLO Node. Using the above example on a 44B, the BED coax would go to the CLIENT port (Joey in the bedroom), on a 42RBQ the MAIN coax would go to the CLIENT port (Joey in the living room).
If you have 2 Joey’s you will connect the input of a DISH approved splitter to the CLIENT port of the SOLO Node and feed the two Joey’s from the output of the splitter.
Below is the final basement wiring setup on my coach for One Hopper 2 and One Joey. The DirecTV equipment was left in place (but unplugged and disconnected) in the event I someday switch to DirecTV.

Simplified coax install: if you have a Hopper/Joey and don’t want to mess with digging out the three DISH coax up on the roof. You could simply use the single coax already there for DirecTV and install the SOLO Node on the roof (it is fully weatherproof). Wire two new short coax from the base of the Trav’ler to the input of the SOLO Node, then connect the former DirecTV coax to the HOST port on the SOLO Node and F-cap terminate the CLIENT port. Glue it to the roof with some blobs of silicone. In the basement you will use a DISH TAP to separate the outputs for the Hopper and Joey(s). See this document to clarify how these parts work together.
For a Hopper 3 setup with a Winegard Trav’ler system produced prior to 1/1/2018 you will need a DISH DPH42 switch. See here.
For a Hopper 3 setup with a Winegard Trav’ler system produced on or after 1/1/2018 you can use the DPH42 described above, but I would recommend the cleaner and less costly approach of using a DISH PRO HYBRID (DPH) LNB instead. See here, but note the original DPH LNB has now been discontinued and replaced with the Slimline model, so you will also need the Yoke Bracket. This Winegard document discusses using the DPH LNB on page 18. This Winegard page offers a DPH LNB kit, but it is a more costly choice.
For a Hopper 3 setup with a Winegard Trav’ler system produced on or after 11/26/2019 or the RP-SK21H conversion kit there is no need for the DPH42 as these systems come ready to go with a DISH PRO HYBRID (DPH) LNB. There is no need to dig out and utilize the three coax, simply use the existing DirectTV coax after removing the DirectTV power inserter.
Hope this helps with your DirecTV to DISH conversion project! Let me know if you have any questions and I will try to help.
SECTION 3 – DISH Western Arc vs Eastern Arc and the Winegard Trav’er
DISH has two groups or “arcs” of satellites to ensure reliable coverage for the entire US. The Western Arc (WA) is comprised of three satellites 110/119/129 and the Eastern Arc (EA) is also comprised of three different satellites 61.5/72/77.
The EA is used primarily in the east (TX and eastward) and the WA is used primarily in the west (TX and westward). Both arcs offer the same (duplicate) programming.
In regard to the Winegard Trav’ler, it comes with a WA LNB and is designed to provide full support ONLY for the WA and will tune all three of the WA satellites simultaneously. However, with the Trav’ler, instead of tuning the WA, it is possible to individually tune any ONE of the EA satellites, even when using the WA LNB. Winegard does not currently support tuning all the EA satellites at the same time with an EA LNB. However even though Winegard refuses to support it, it is possible to install an EA LNB on the Trav’ler and in some parts of the country it will tune 61.5 and 72 at the same time. We do this every time we return to the New England area, I’ll discuss this in more details further below.
For those of us that travel, the two arcs present both a blessing and a curse.
The blessing is that in cases where you can’t tune all the WA satellites, or at least one of them, a second chance is provided by trying to tune one of the EA satellites (61.5 being preferred). This can – and does – happen often due to partial tree cover on a site. It has benefited us on many occasions. Also, tuning 61.5 is practically a necessity in the case of New England where 129 is all but impossible to receive due to it being so low in the sky.
The curse is it gets way more complicated, specifically in regard to High Definition (HD) locals! Realize that local programming is required by the FCC to be “spot beamed” into local “markets” (city/state/zip). Yes “spot beams” actually exist and do restrict reception to a narrow geographic area, the precise area varies by spot beam but is usually limited to a few hundred miles. Within the spot beam, the DMA or “Designated Market Area”, further restricts the reception to local channels for the specific market where the customer lives. There can be several DMA’s within a single spot beam. For example the Boston, Providence and Hartford markets (among others) are very close together and covered by a single spot beam, but the DMA (determined by zip code) ensures that residents of those cities get only their respective local programming.
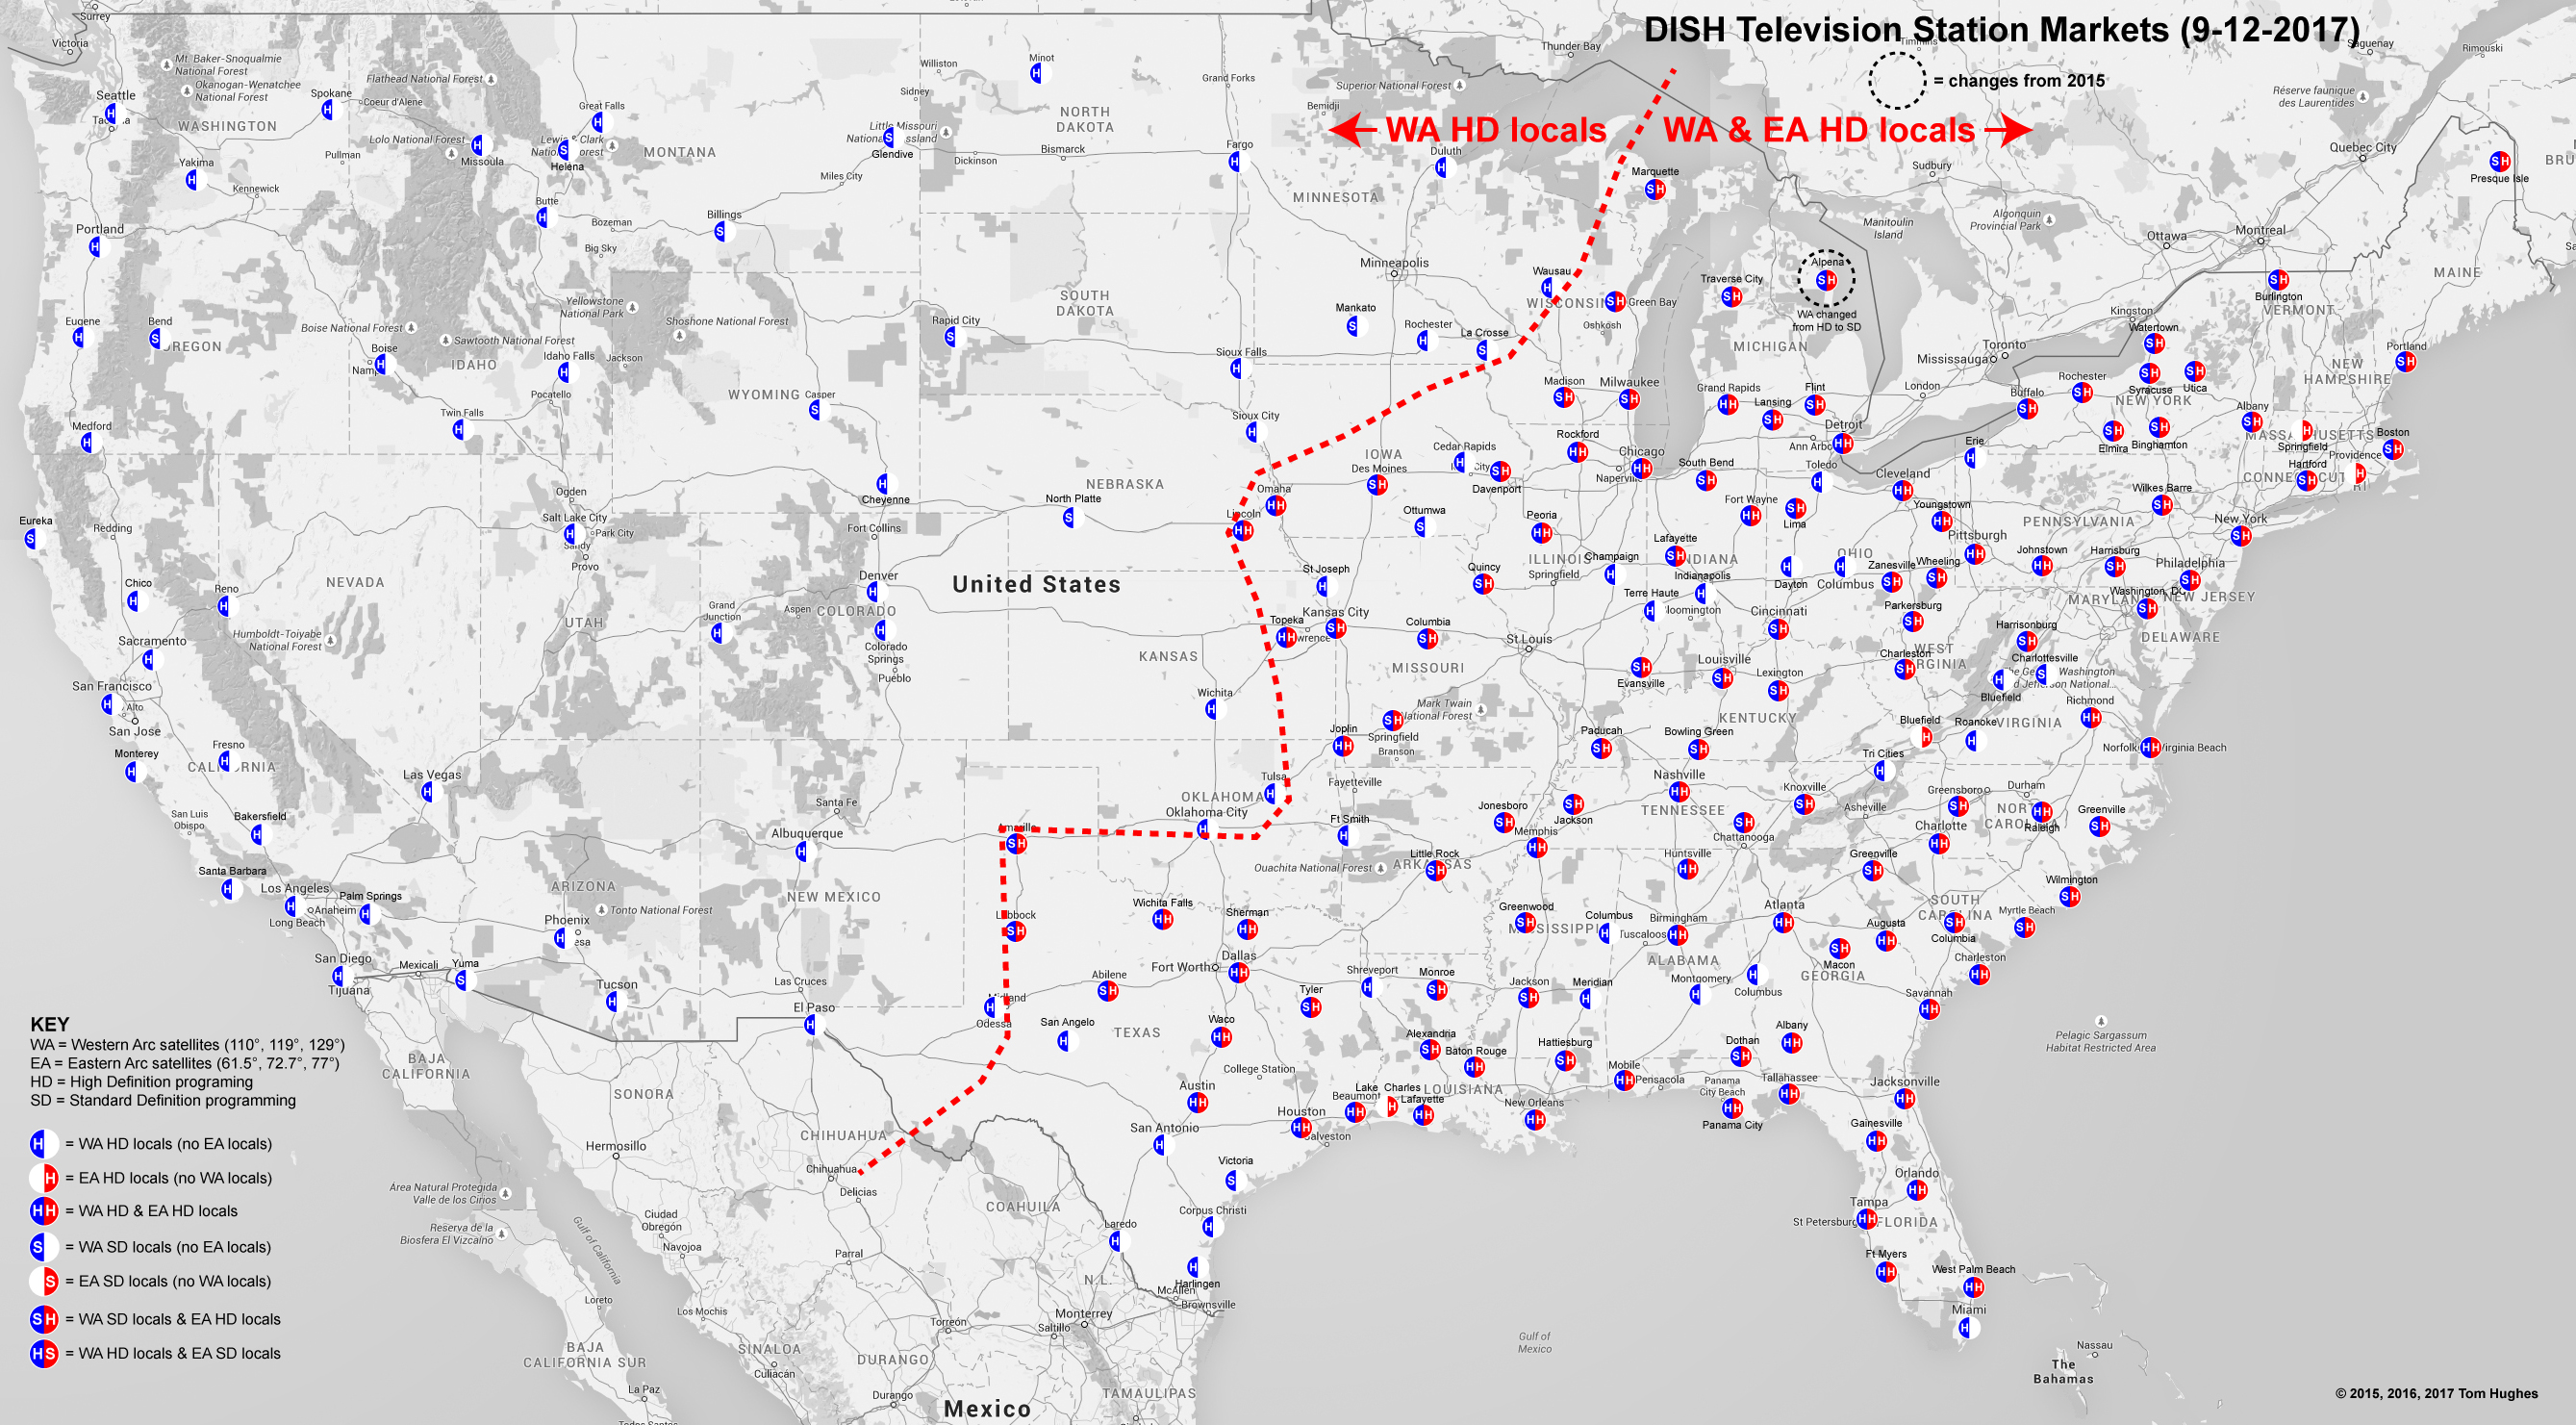
But spot beams and DMA’s aren’t really the problem, it’s that DISH can use the WA, the EA or in some cases both, to supply the HD locals for a particular market. As time goes forward DISH appears to be in the process of migrating more and more HD locals to the EA in the eastern US. As of this writing, of the 212 markets I counted, only 46 of them have HD locals on both the WA and EA (these are mostly in the southeast), 92 markets have HD locals on the EA ONLY and 77 markets have HD locals on WA ONLY. This means that in 92 of the 138 cities in the eastern half of the US you MUST tune 61.5 to get HD Locals!
This presents a confusing dilemma for those of us trying to use a Winegard Travler in the east – and by east I mean ALL of the east from TX eastward, not just the northeast or New England. Undoubtedly you will eventually run into a market where you can tune the WA with your Trav’ler, but will only get SD locals – and in some cases no locals at all!
How to tell what satellite(s) have the HD locals for a given market:
To visualize this, the excellent map below from RV Senior Moments is very helpful. Unfortunately the last time it was updated was in 2017 and things have changed. There are several more markets now that do not support HD locals on the WA. Note there are some markets like Providence RI, Springfield, MA and Bluefield WV where there are NO locals – SD or HD – on the WA, you MUST use EA if you want any locals in those markets.
So what to do if the HD locals aren’t on the WA?
If you don’t care about HD locals then you don’t need to worry about it and you can just use the WA all the time (unless you are in an area where you can’t “see” 129). If you do care about HD locals, and especially if you have a Hopper and enjoy Prime Time Anytime (which only works with HD), then you’re only option with the Trav’ler is to manually tune 61.5 (in some cases 77). That will fix your locals, but you may loose some other programming depending on your package.
To help you decide what satellite to tune based on your location, see below for an up to date chart I made that shows by market what satellites have the HD locals. The chart is color coded and designed to make it easy for you to determine what satellite to tune to receive HD locals for your location.
Tuning Guide for DISH HD Locals by Market as of 20191119
HD Access by DISH Market Settings For Winegard Trav’ler with standard Western Arc LNB:,© 2020 Rob Picchione ,Last Update: 11-23-2020 Use standard Trav’ler Multi-Sat mode to receive HD locals Manually tune 61.5 to receive HD locals & most other channels, otherwise locals will be in SD MUST manual…
Note that the primary satellite in regard to programming content on the EA is 61.5 which in all but four markets provides HD locals as well as the majority of the programming for the basic channel packages. 61.5 also includes at least a subset of some of the premium channels. On the WA, the HD locals are scattered among the three (110/119/129) satellites depending on market, but most of the other basic programming and premiums are on 129.
Also be aware that you can play some games now that you know which satellites serve which specific markets. Consider that when you change locations, you need to change your DISH “service address” to activate the locals on the spot beam for your location. In many cases however spot beams overlap. So changing the service address to a nearby city instead of your precise actual location may have some benefit. For example Jacksonville, FL does not have HD locals on the WA, but Orlando, FL does. So if you were to change your service address to one in the Orlando spot beam area, you would get HD locals for Orlando. I usually look up a campground in the market area and submit that as my service address.
Other options?
Another option for dealing with the DISH HD Locals dilemma is to dump your Trav’ler and go with an RF Mogul which recently introduced full DISH EA support with an EA LNB (tunes 61.5 and 72 which in most cases is all that is needed). If we had an RF Mogul I would install the EA LNB and just leave it on until we ventured west of Texas, at which point I would swap it with a WA LNB.
However, there is a downside to the RF Mogul. Remember the “blessing” we discussed previously of being able to tune 61.5 manually to work around tree cover? Well, the RF Mogul works very differently from the Winegard Trav’ler and you can’t do that (as far as I know). RF Mogul uses GPS location info to determine the elevation and skew settings for the dish, then more or less blindly rotates thru the azimuth (direction) seeking the strongest signal. Unlike the Winegard the RF Mogul has no means of actually identifying the satellites it finds, therefore as far as I know you cannot “manually” tune a satellite in the other arc. Please let me know if you know otherwise.
A third option is to use an OTA tuner to get your locals. This of course assumes you are within reception range of the OTA broadcast towers. If you have a Hopper, or other DVR, you lose Prime Time Anytime capability with this method. Also you may only be able to record one or two OTA channels at a time (vs. the Hopper’s 16 tuners) depending on your DVR’s OTA capabilities. Another downside of this method is you must have access to at least one satellite (on either arc) to get guide info, without guide info you cannot watch OTA locals on your Hopper – but you could watch them live via your TV’s tuner.
Bottom line there is no perfect solution. If Winegard would endeavor to fully support an EA LNB that would provide the best of both worlds, however my experience with them is this has all the likelihood of hell freezing over. There is somewhat more of an opportunity that RF Mogul will provide a means of manually tuning a satellite.
Winegard Trav’ler with an EA LNB
While Winegard does’t officially support an EA LNB, it is relatively simple to install one and it works perfectly fine with my Hopper which easily recognizes it. The issue is the Trav’ler won’t tune all the EA satellites at the same time, because it doesn’t have the software to seek them and properly adjust the skew (tilt) angle. If Winegard would simply add a manual skew feature to the Trav’ler software, that would solve this problem and make me very happy.
However, there is an anomaly I have discovered while using an EA LNB on the Trav’ler while in the northeast US. It turns out that the skew angle is near 90 degrees in this part of the country which means it is not necessary to tilt the dish to receive multiple satellites. In practice I have found that if I manually tune 72, I will also receive 61.5 even though the Trav’ler doesn’t adjust the skew. This has been a boon to us as we typically summer in the New England area, specifically in the Providence, RI market. 61.5 and 72 provide all my DISH programming which is a good thing because there are NO locals at all (not even SD versions) on the WA for the Providence market. Additionally I have found that this anomaly holds true throughout New England, as far east as OH and as far south as PA. The above works until the skew angle dips below about 80 degrees. You can calculate the skew angle for a give location here (select DISH 1000.2 EA). Theoretically climbing up on the roof and manually adjusting the skew should allow the EA LNB to work anywhere, but I have never tried it.
The photo below shows this anomaly in action. This is the DISH configuration after a “Test Installation” (aka “Check Switch”) while on our site in East Greenwich, RI. In this instance I have manually tuned 72 with the Wingard Trav’ler. Then run the Test Installation which finds both 72 and 61.5 as shown under “Switch Status”. Just above the “SIGNAL STRENGTH” section, note the “Switch” is shown as “Hybrid Twin EA.2” indicating a Dish Pro Hybrid Eastern Arc twin 61.5/72 LNB. Note that 61.5 also has a very strong signal level. Satellite 72 (which is the one I manually tuned) has a signal strength of 57.

Comments
Converting a Winegard DirectTV SWM Trav’ler to DISH on a 2017 Entegra — No Comments